Monday, August 17, 2009
Mount DeWalt DW621 router to Kreg Precision Router Table insert plate
Here are the steps:
Step 1: Mark the edge of the router base plate that you want to face front with a piece of masking tape
Step 2: Place the insert plate face down on work surface with Kreg logo close to you
Step 3: Position the bull’s eye template so that the concentric rings line up with the opening of the insert plate.
Step 4: Remove the base plate from the router and using it to find the correct drill bit size for drilling holes in the insert plate
Step 5: Place the base plate face down on the bull’s eye template and center it on the concentric rings. Use the masking tape to secure the two together
Step 6: Place a sacrificial board on the drill press under the plate to reduce the possibility of blowout
Step 7: With three items secure, drill the holes using drill press
Step 8: Clamp the insert plate to drill press and drill holes into the insert plate
Step 9: After the holes are drilled separate the three items and using a counter sink bit to counter sink each hole on the top side of the insert plate to accommodate the mounting hardware
Step 10: The screw head should not sit above flush or too far below. I used 20mm long base plate screw to connect the base plate to router
I tried to ensure that the router bit stay at the center of the circular opening of the router table's insert plate. One of the mounting screws hole is on the edge
. I used a 14 mm long screw for this lower height hole.
Sunday, August 9, 2009
Resizing the length of machine screws
Here are the steps to re-size the screws to 20 mm length:
Step 1: Cut router plate screws to proper length
Step 1a: Gather up the necessary tools and materials
(i) Vice
(ii) Hacksaw
(iii)Marker pen
(iv)File
(v)Foot rule
Step 1b: Measure the length of the Router plate screw needed.
Step 1c: Mark a circle on the screw where it needs to be cut.
Step 1d: Setup the screw in a vice to cut it to proper length
Step 1e: Cut the screws with hacksaw
Step 1f: Measure the length of the cut screws and file the bottom
Step 1g: Test the screws on router
Friday, August 7, 2009
Simple Pleasures
Seed Saving
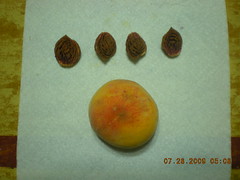
In this day and age when job losses are becoming more frequent food is a major concern for everyone. What if one can have food without worrying about having a job to pay for it? That is nothing short of possible. This peach came in a box of six and was purchased at our local farmer’s market. The peach seeds have been rinsed off and pat dry with a paper towel. They sat at room temperature to dry for 1-2 weeks and then placed inside an enveloped and sealed in a glass jar. The day we set up our farm these seeds will be sown and grown for our food. We’ll never have to worry about worry about jobs or income ever again. Our crops are the income that will feed us for the rest of our lives.
Monday, August 3, 2009
Housekeeping the Way It Was Meant To Be
Sunday, August 2, 2009
Sunrise in the pot
It has been little over two months since I posted my first blog entry on tomatoes growing in pots in our front yard. Today these two tomatoes have completed a full circle. I can see a reddish hue at the bottom of both the tomatoes. These are the first two tomatoes maturing this season. Two months of hard work and we have these two beauties teasing us to pick them up and cook something delicious.
The joy of watching the reddish hue first thing in the morning today was as wonderful as watching the first rays of sun in the morning.
The sun, the rain, the bees, the workers at the planting pot making factory, the makers of Miracle Grow fertilizer and the curious onlookers have contributed to this success. Thank you goes to all of them. We have a great team here. Hope to repeat this success for rest of the tomatoes this season and more in next season.
Metric measurement in a world of US measurement system
I have never thought about the type of screws in my power tools, let alone the measurement system used the measure them.
Things changed this weekend. This weekend I was planning to
I have an inch-system micrometer which measures thickness in fraction of inches. I used this micrometer to get an approximate measurement of the screw. I thought the screw is 5/32” thick at its threads. I could not find any odd fractional machine screw at my local Lowes. I picked up a few 8-32 ¾” screws. When I came home and tried the new screws on router, they did not fit.
The next step was to do some online research on this particular screw. eReplacement parts.com has a nice picture of all the router parts for DW621
Fig # 7 in the above link is the screw type I was looking for but twice its original length.
Once I get this screw, I will use a hack saw to cut it down to the required length.
I also ordered a metric drill bit to drill a hole for this 4mm screw.
Next week I will be experimenting with the metric drill bit and metric screw from amazon.com.
Couple of interesting links on metric measurement system, I came across during my research:
http://en.wikipedia.org/wiki/ISO_metric_screw_thread
http://www.france-property-and-information.com/imperial-system-and-history.htm


