It was a hot summer day. Like the heat melts two metal bodies to one, two of my hobbies, cooking and wood working came together today. . This lovely french rolling pin can stand on its own (no pun intended) ;) I'm yet to try out the rolling characteristics of this pin. This was a good project to start my wood turning adventure.
Have you ever wondered, we all have different hand sizes and hand structures, then why should we use the mass produced rolling pins? Shouldn't the rolling pins be taylored for you?
Sunday, July 25, 2010


Sunday, May 23, 2010
Book/Document Scanner setup
The challenges of using a traditional flat bed scanner are:
There were some wooden boards lying around my workshop and I put something real quick. I was not satisfied by the image quality of Nikon L14 (7.1 megapixels) camera so I went to Compusa store to pick up a 12.2 megapixels digital camera.
Picked up $2.5 glass plate from local hardware store (Lowes). The glass plate keeps the page flatter. The glass plate also creates reflection of the opposite page. The black card board is used to prevent the reflection from the facing page.
Finally, I'm happy with the results...

- Flatbed Scanners are slow due to the moving mechanical scan head. A typical sub $200 scanner can scan a document in 30 seconds to 2 minutes.
- Very hard to scan a thick book. The scanner cover does not cover the book fully and the scan does not turn out too well.
- The bindings of a book does not like the scanning process
There were some wooden boards lying around my workshop and I put something real quick. I was not satisfied by the image quality of Nikon L14 (7.1 megapixels) camera so I went to Compusa store to pick up a 12.2 megapixels digital camera.
Picked up $2.5 glass plate from local hardware store (Lowes). The glass plate keeps the page flatter. The glass plate also creates reflection of the opposite page. The black card board is used to prevent the reflection from the facing page.
Finally, I'm happy with the results...
Sunday, May 2, 2010
Peanut Butter Cookies
It has been a while since I made cookies. The last time I made cookies at home, I used Nestle's frozen cookie dough. This time I decided to make cookies from scratch. Ended up with 16 cookies. By the time I was able to get hold of a camera, 3 cookies were already gone.
They turned out to be a little on the soft side as I was generous with heavy cream. Maybe next time, I will try to make them a litte more chewy.
Prep Time - 30 min
Cook Time - 30 min
8 servings
Ingredients
1¼ cups of flour
½ teaspoon salt
1 teaspoon baking powder
½ cup butter
1/2 cup peanut butter
½ cup sugar
½ cup brown sugar
½ teaspoon vanilla
1 egg
1 cup heavy cream
Directions
1. Combine flour, salt, & baking powder. Sift.
2. In a separate bowl, combine peanut butter, brown sugar, sugar, and butter.
3. And cream until fluffy.
4. Beat in egg and vanilla.
5. Blend in flour mixture to the peanut butter mixture.
6. Your batter should be stiff enough that when you stick your spoon in vertically, the spoon will stay in place and not fall over (if it is too runny, add a bit more flour). At this point, I usually refrigerate my dough for about 20-30 minutes. For me, this dough is easier to work with when it’s chilled.
7. After chilling (if you chose to do so), roll dough into 1 inch balls and place on greased baking sheet (I line mine with parchment paper instead). Press fork into dough to make an impression.
8. Bake at 375 degrees Fahrenheit for 10-12 minutes, or until bottom edges turn light brown. Remove from oven and place sheet on wire rack/stove top. Allow the peanut butter cookies to sit on the baking sheet for 2 - 3 minutes (or else they will crumble). Then, transfer the peanut butter cookies from baking sheet to plate. Enjoy!

They turned out to be a little on the soft side as I was generous with heavy cream. Maybe next time, I will try to make them a litte more chewy.
Prep Time - 30 min
Cook Time - 30 min
8 servings
Ingredients
1¼ cups of flour
½ teaspoon salt
1 teaspoon baking powder
½ cup butter
1/2 cup peanut butter
½ cup sugar
½ cup brown sugar
½ teaspoon vanilla
1 egg
1 cup heavy cream
Directions
1. Combine flour, salt, & baking powder. Sift.
2. In a separate bowl, combine peanut butter, brown sugar, sugar, and butter.
3. And cream until fluffy.
4. Beat in egg and vanilla.
5. Blend in flour mixture to the peanut butter mixture.
6. Your batter should be stiff enough that when you stick your spoon in vertically, the spoon will stay in place and not fall over (if it is too runny, add a bit more flour). At this point, I usually refrigerate my dough for about 20-30 minutes. For me, this dough is easier to work with when it’s chilled.
7. After chilling (if you chose to do so), roll dough into 1 inch balls and place on greased baking sheet (I line mine with parchment paper instead). Press fork into dough to make an impression.
8. Bake at 375 degrees Fahrenheit for 10-12 minutes, or until bottom edges turn light brown. Remove from oven and place sheet on wire rack/stove top. Allow the peanut butter cookies to sit on the baking sheet for 2 - 3 minutes (or else they will crumble). Then, transfer the peanut butter cookies from baking sheet to plate. Enjoy!
Sunday, January 24, 2010
Squat Toilet Adapter
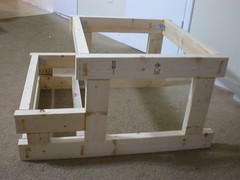
About seven months ago I read a very interesting post on LATOC with title
Psychological effect of cars and sitting in chairs. This post inspired me to come up with the idea of squat toilet adapter.
In most of Asia, squatting is a way of life. Squat toilet can heal constipation and many other health problems. The benefits of squat toilet is well documented in Squat - Don't Sit post.
In western world, squat toilet is near impossible to find. Folks living in apartments can't change their toilets even if they want to.
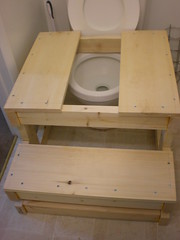
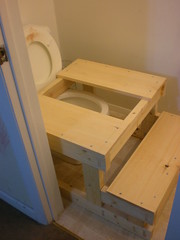
This wooden frame structure is made from 2X4 and panels which I got from local hardware store. When this structure is placed over the existing toilet, it is possible to use the toilet in a squatting position.
Sunday, December 20, 2009
Clothes Drying Rack Video
It has been six months since I built my first clothes drying rack. Now I have two of these structures at my home. They have been working out great for my family. We have an electric dryer but we hardly use it. It takes about 24 hours for clothes to dry indoors even in winter temperatures hovering around 30 F. I received quiet a few requests to provide more details about the construction of this clothes drying rack.
The photo of this dryer published six months ago did not have enough details. Hopefully this youtube video will do justice to this rack.
This clothes drying rack is built from PVC pipes available at local hardware store.
Some of the salient features of this drying rack are:
(1) Light weight
(2) Portable
(3) Relatively cheap
(4) Built from easily available material
Materials used:
(1) 40 ft of 3/4" thick PVC pipes.
Usually the hardware stores sell 10 ft long pipes
This will cost ~ $8
(2)20 3/4 inch Tee Socket
It is cheaper to buy a bag of 10.
This will cost ~ $10
The material cost of this rack is under $20
(1) Cut 16 section of 18" length
(2) Cut 8 section of 24" length
(3) Join the sections with T-sockets
The photo of this dryer published six months ago did not have enough details. Hopefully this youtube video will do justice to this rack.
This clothes drying rack is built from PVC pipes available at local hardware store.
Some of the salient features of this drying rack are:
(1) Light weight
(2) Portable
(3) Relatively cheap
(4) Built from easily available material
Materials used:
(1) 40 ft of 3/4" thick PVC pipes.
Usually the hardware stores sell 10 ft long pipes
This will cost ~ $8
(2)20 3/4 inch Tee Socket
It is cheaper to buy a bag of 10.
This will cost ~ $10
The material cost of this rack is under $20
(1) Cut 16 section of 18" length
(2) Cut 8 section of 24" length
(3) Join the sections with T-sockets
Tuesday, November 17, 2009
The Bottleneck
Webster Defines bottleneck as "a narrow route"
Why did the Neanderthals disappear? They lived for 400 thousand years.
Why did Homo Sapiens survive and all others disappeared?
What is the differentiation factor?
Saw this one on TV last week
Becoming Human Last Human Standing
Though there is an embedded message.
We are at another evolutionary bottleneck. Another resource crunch. The bottle-neck of Peak Oil. Those of us who can survive and adapt to a much lower energy lifestyle will come out of this bottleneck. Rest will disappear in the endless sand of time and become the Neanderthal fossils. We need to redefine progress and growth. Infinite growth on a planet is mathematically impossible. Rest of the world wants to follow the so called 'developed' nations. This is not a path to prosperity but a path to the proverbial yeast killing itself in its own alcoholic excrement.
Growth is embedded in human evolutionary physiology. It is impossible for politicians, corporate leaders and rest of the people in power to even think of a path other than growth. Anyone who wants to come out of the bottleneck ahead of us must think against the concepts of growth embedded in our DNA and move to much much lower energy lifestyle.
Why did the Neanderthals disappear? They lived for 400 thousand years.
Why did Homo Sapiens survive and all others disappeared?
What is the differentiation factor?
Saw this one on TV last week
Becoming Human Last Human Standing
Though there is an embedded message.
We are at another evolutionary bottleneck. Another resource crunch. The bottle-neck of Peak Oil. Those of us who can survive and adapt to a much lower energy lifestyle will come out of this bottleneck. Rest will disappear in the endless sand of time and become the Neanderthal fossils. We need to redefine progress and growth. Infinite growth on a planet is mathematically impossible. Rest of the world wants to follow the so called 'developed' nations. This is not a path to prosperity but a path to the proverbial yeast killing itself in its own alcoholic excrement.
Growth is embedded in human evolutionary physiology. It is impossible for politicians, corporate leaders and rest of the people in power to even think of a path other than growth. Anyone who wants to come out of the bottleneck ahead of us must think against the concepts of growth embedded in our DNA and move to much much lower energy lifestyle.
Thursday, November 12, 2009
Toddler socks


I made this pair of socks for my toddler son last year.
Instructions
These are made in sport weight yarn, with a ribbed leg. You can do them in one colour, or in a combination of colours. I made a pair in orange, with black stripes at the top of the leg and black for the heel and toe. (they were for the baby of a teacher I work with, and these are the school colours!)
**Special Abbreviation: ssk - this is an alternative to the old psso decrease. To ssk, you slip the next two stitches knitwise, then insert the tip of the left hand needle into the front of these two stitches, then knit them together. If you prefer, you could always use the psso decrease instead. (Slip 1, knit one, pass slipped stitch over), but I find the ssk is quicker and neater.
Materials:
One set of 3.25 mm double-pointed needles.
Sport or DK weight yarn.
Optional: contrast for stripes, heel and toes.
Cast on 32 stitches, distributed evenly on three needles:
1st needle: 10 stitches
2nd needle: 12 stitches
3rd needle: 10 stitches
Rib in k1, p1 ribbing for 4 inches.
Heel:
k1, p1 for 8 stitches off of the first needle. Turn, p8, then p8 from third needle. You now have 16 stitches on one needle for the heel flap. Turn.
Work another 12 rows in stockinette stitch.
Turning the heel:
Row 1: k8, place marker, k2, ssk, k1, turn
Row 2: sl 1, purl to 2 stitches past the marker, p2tog, p1, turn
Row 3: sl 1, knit to 3 stitches past the marker, k2tog, k1, turn
Row 4: sl 1, purl to 3 stitches past the marker, p2tog, p1, turn
Row 5: sl 1, knit to 4 stitches past the marker, k2tog, turn
Row 6: purl to 4 stitches past the marker, p2tog, turn
Row 7: knit
Pick up 8 stitches along the first side of the heel flap. Using the second needle, knit across the 16 instep stitches. Using a third needle, pick up 8 stitches on the other side of the heelflap, and knit 5 stitches from the first needle.
Shaping the instep:
Next round: knit
Decrease round: 1st needle - knit to last three stitches, k2tog, k1.
2nd needle - knit across.
3rd needle - k1, ssk, knit to end.
Repeat these two rounds until there are 32 stitches remaining.
Knit 15 rounds in stockinette stitch.
Shaping the toe:
Next round: knit
Decrease round: 1st needle - knit to last three stitches, k2tog, k1.
2nd needle - knit 1, ssk, knit to last three stitches, k2tog, k1.
3rd needle - k1, ssk, knit to end.
These instructions are from geocities.com but the link is not working.
Useful youtube vidoes:
Subscribe to:
Posts (Atom)
