Sunday, September 19, 2010

Re-inventing the Wheel


Side View of the toy
Originally uploaded by sumantamandal
This weekend I spent some time with my kids to design and fabricate a basic two wheel toy. First we designed the toy using google sketchup.


This toy is made out of wood available at local hardware store. The toy consists of:
* two 4" diameter wheels
*9" long axle
*2 wheel caps
*connecting rod to axle
* string for pulling

I used a 4" hole saw to cut the wheels out of wooden board. The holes in the wheels for the axle was cut using a Forstner bit. The two end of the axle was rounded on the lathe. The diameter of the axle is 3/4"

We might not have re-invented the wheel but we had a lot of fun building this project. The kids got an opportunity to learn the fun of design and got to appreciate the basic building blocks of transportation.

Click here for more pictures.

Please leave your questions, comments and suggestions about this project.

Tuesday, August 10, 2010

First Tomato Harvest from 2010

This year I planted Roma tomatoes in the same pot that I used for beefstake tomatoes last year. Did not add any fresh potting soil this year. Added a bit of organic manure and powedered egg shells plus regular dose (once in 2-3 weeks) of fish fertilizer.

Found cracks on several tomatoes. Tells me that the plant needs more watering.

Used the tomatoes for Roasted Ricotta Roma Tomatoes (RRRT) immediately after they were harvested.

Sunday, July 25, 2010

My First turning work - French Rolling Pin


DSC_0076
Originally uploaded by sumantamandal
It was a hot summer day. Like the heat melts two metal bodies to one, two of my hobbies, cooking and wood working came together today. . This lovely french rolling pin can stand on its own (no pun intended) ;) I'm yet to try out the rolling characteristics of this pin. This was a good project to start my wood turning adventure.

Have you ever wondered, we all have different hand sizes and hand structures, then why should we use the mass produced rolling pins? Shouldn't the rolling pins be taylored for you?

Sunday, May 23, 2010

Book/Document Scanner setup


DSCN0981
Originally uploaded by sumantamandal
The challenges of using a traditional flat bed scanner are:
  • Flatbed Scanners are slow due to the moving mechanical scan head. A typical sub $200 scanner can scan a document in 30 seconds to 2 minutes.
  • Very hard to scan a thick book. The scanner cover does not cover the book fully and the scan does not turn out too well.
  • The bindings of a book does not like the scanning process
I did some search on google.com for an alternate solution and came across the wonderful site http://diybookscanner.org/ maintained by Daniel Reetz.

There were some wooden boards lying around my workshop and I put something real quick. I was not satisfied by the image quality of Nikon L14 (7.1 megapixels) camera so I went to Compusa store to pick up a 12.2 megapixels digital camera.

Picked up $2.5 glass plate from local hardware store (Lowes). The glass plate keeps the page flatter. The glass plate also creates reflection of the opposite page. The black card board is used to prevent the reflection from the facing page.

Finally, I'm happy with the results...

Sunday, May 2, 2010

Peanut Butter Cookies


Peanut Butter Cookies
Originally uploaded by

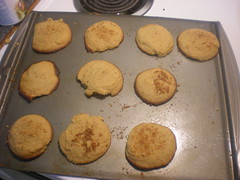
It has been a while since I made cookies. The last time I made cookies at home, I used Nestle's frozen cookie dough. This time I decided to make cookies from scratch. Ended up with 16 cookies. By the time I was able to get hold of a camera, 3 cookies were already gone.

They turned out to be a little on the soft side as I was generous with heavy cream. Maybe next time, I will try to make them a litte more chewy.


Prep Time - 30 min
Cook Time - 30 min
8 servings

Ingredients
1¼ cups of flour
½ teaspoon salt
1 teaspoon baking powder
½ cup butter
1/2 cup peanut butter
½ cup sugar
½ cup brown sugar
½ teaspoon vanilla
1 egg
1 cup heavy cream

Directions
1. Combine flour, salt, & baking powder. Sift.
2. In a separate bowl, combine peanut butter, brown sugar, sugar, and butter.
3. And cream until fluffy.
4. Beat in egg and vanilla.
5. Blend in flour mixture to the peanut butter mixture.
6. Your batter should be stiff enough that when you stick your spoon in vertically, the spoon will stay in place and not fall over (if it is too runny, add a bit more flour). At this point, I usually refrigerate my dough for about 20-30 minutes. For me, this dough is easier to work with when it’s chilled.
7. After chilling (if you chose to do so), roll dough into 1 inch balls and place on greased baking sheet (I line mine with parchment paper instead). Press fork into dough to make an impression.
8. Bake at 375 degrees Fahrenheit for 10-12 minutes, or until bottom edges turn light brown. Remove from oven and place sheet on wire rack/stove top. Allow the peanut butter cookies to sit on the baking sheet for 2 - 3 minutes (or else they will crumble). Then, transfer the peanut butter cookies from baking sheet to plate. Enjoy!

Sunday, January 24, 2010

Squat Toilet Adapter


About seven months ago I read a very interesting post on LATOC with title
Psychological effect of cars and sitting in chairs. This post inspired me to come up with the idea of squat toilet adapter.


In most of Asia, squatting is a way of life. Squat toilet can heal constipation and many other health problems. The benefits of squat toilet is well documented in Squat - Don't Sit post.

In western world, squat toilet is near impossible to find. Folks living in apartments can't change their toilets even if they want to.


This wooden frame structure is made from 2X4 and panels which I got from local hardware store. When this structure is placed over the existing toilet, it is possible to use the toilet in a squatting position.

Sunday, December 20, 2009

Clothes Drying Rack Video

It has been six months since I built my first clothes drying rack. Now I have two of these structures at my home. They have been working out great for my family. We have an electric dryer but we hardly use it. It takes about 24 hours for clothes to dry indoors even in winter temperatures hovering around 30 F. I received quiet a few requests to provide more details about the construction of this clothes drying rack.

The photo of this dryer published six months ago did not have enough details. Hopefully this youtube video will do justice to this rack.


This clothes drying rack is built from PVC pipes available at local hardware store.

Some of the salient features of this drying rack are:
(1) Light weight
(2) Portable
(3) Relatively cheap
(4) Built from easily available material

Materials used:
(1) 40 ft of 3/4" thick PVC pipes.
Usually the hardware stores sell 10 ft long pipes
This will cost ~ $8

(2)20 3/4 inch Tee Socket
It is cheaper to buy a bag of 10.
This will cost ~ $10

The material cost of this rack is under $20

(1) Cut 16 section of 18" length
(2) Cut 8 section of 24" length
(3) Join the sections with T-sockets