It has been six months since I built my first clothes drying rack. Now I have two of these structures at my home. They have been working out great for my family. We have an electric dryer but we hardly use it. It takes about 24 hours for clothes to dry indoors even in winter temperatures hovering around 30 F. I received quiet a few requests to provide more details about the construction of this clothes drying rack.
The photo of this dryer published six months ago did not have enough details. Hopefully this youtube video will do justice to this rack.
This clothes drying rack is built from PVC pipes available at local hardware store.
Some of the salient features of this drying rack are:
(1) Light weight
(2) Portable
(3) Relatively cheap
(4) Built from easily available material
Materials used:
(1) 40 ft of 3/4" thick PVC pipes.
Usually the hardware stores sell 10 ft long pipes
This will cost ~ $8
(2)20 3/4 inch Tee Socket
It is cheaper to buy a bag of 10.
This will cost ~ $10
The material cost of this rack is under $20
(1) Cut 16 section of 18" length
(2) Cut 8 section of 24" length
(3) Join the sections with T-sockets
Sunday, December 20, 2009
Tuesday, November 17, 2009
The Bottleneck
Webster Defines bottleneck as "a narrow route"
Why did the Neanderthals disappear? They lived for 400 thousand years.
Why did Homo Sapiens survive and all others disappeared?
What is the differentiation factor?
Saw this one on TV last week
Becoming Human Last Human Standing
Though there is an embedded message.
We are at another evolutionary bottleneck. Another resource crunch. The bottle-neck of Peak Oil. Those of us who can survive and adapt to a much lower energy lifestyle will come out of this bottleneck. Rest will disappear in the endless sand of time and become the Neanderthal fossils. We need to redefine progress and growth. Infinite growth on a planet is mathematically impossible. Rest of the world wants to follow the so called 'developed' nations. This is not a path to prosperity but a path to the proverbial yeast killing itself in its own alcoholic excrement.
Growth is embedded in human evolutionary physiology. It is impossible for politicians, corporate leaders and rest of the people in power to even think of a path other than growth. Anyone who wants to come out of the bottleneck ahead of us must think against the concepts of growth embedded in our DNA and move to much much lower energy lifestyle.
Thursday, November 12, 2009
Toddler socks


I made this pair of socks for my toddler son last year.
Instructions
These are made in sport weight yarn, with a ribbed leg. You can do them in one colour, or in a combination of colours. I made a pair in orange, with black stripes at the top of the leg and black for the heel and toe. (they were for the baby of a teacher I work with, and these are the school colours!)
**Special Abbreviation: ssk - this is an alternative to the old psso decrease. To ssk, you slip the next two stitches knitwise, then insert the tip of the left hand needle into the front of these two stitches, then knit them together. If you prefer, you could always use the psso decrease instead. (Slip 1, knit one, pass slipped stitch over), but I find the ssk is quicker and neater.
Materials:
One set of 3.25 mm double-pointed needles.
Sport or DK weight yarn.
Optional: contrast for stripes, heel and toes.
Cast on 32 stitches, distributed evenly on three needles:
1st needle: 10 stitches
2nd needle: 12 stitches
3rd needle: 10 stitches
Rib in k1, p1 ribbing for 4 inches.
Heel:
k1, p1 for 8 stitches off of the first needle. Turn, p8, then p8 from third needle. You now have 16 stitches on one needle for the heel flap. Turn.
Work another 12 rows in stockinette stitch.
Turning the heel:
Row 1: k8, place marker, k2, ssk, k1, turn
Row 2: sl 1, purl to 2 stitches past the marker, p2tog, p1, turn
Row 3: sl 1, knit to 3 stitches past the marker, k2tog, k1, turn
Row 4: sl 1, purl to 3 stitches past the marker, p2tog, p1, turn
Row 5: sl 1, knit to 4 stitches past the marker, k2tog, turn
Row 6: purl to 4 stitches past the marker, p2tog, turn
Row 7: knit
Pick up 8 stitches along the first side of the heel flap. Using the second needle, knit across the 16 instep stitches. Using a third needle, pick up 8 stitches on the other side of the heelflap, and knit 5 stitches from the first needle.
Shaping the instep:
Next round: knit
Decrease round: 1st needle - knit to last three stitches, k2tog, k1.
2nd needle - knit across.
3rd needle - k1, ssk, knit to end.
Repeat these two rounds until there are 32 stitches remaining.
Knit 15 rounds in stockinette stitch.
Shaping the toe:
Next round: knit
Decrease round: 1st needle - knit to last three stitches, k2tog, k1.
2nd needle - knit 1, ssk, knit to last three stitches, k2tog, k1.
3rd needle - k1, ssk, knit to end.
These instructions are from geocities.com but the link is not working.
Useful youtube vidoes:
Sunday, November 1, 2009
1840s Carolina Village
On October 24th I went visited Hart Square. This is a 200 acre farm owned by Dr. Hart. He has tried to recreate life of settlers in Catawba county in 1840s in his farm. This place is open to visitors only once a year on the 4th Saturday of October. The tickets get sold out very fast
This place is close to Hickory NC. It was raining very hard so the drive up there was not too great. There was no rain at Hart Square so we were able to enjoy rest of the day. Life back then was simple with no plastic pumpkins. There was no TV, no malls and people had real jobs.
I took as many pictures I could from different types of professions people had back then like coopering, shoe making to wheel wrights.
We picked up a pound of $2 corm meal from the water driven grain mill. The corn bread made from this corn meal was delicious :)
Pictures cannot do justice to the great atmosphere that me and my family enjoyed that day. Please enjoy this sideshow of over 200 pictures. The originals of each picture is 16X of the one shared on web. If anyone is interested in any specific original then please leave a comment on my blog and I will get back to you.
Get the flash player here: http://www.adobe.com/flashplayer
Wood Shaving's from board Jointing
Yesterday, I finally got some time to use my shiny new
#7 Jointer plane. Its a beautiful product from Lie Neilsen.
Works right out of the box without any need for tuning.
This picture below tell the story of shavings from this
white oak board. I could have had this board jointed at
the lumber yard for $0.35/bf but I would have denied myself
the joy of shaving and some arm exercise.
Saturday, October 17, 2009
Antique Farm Equipment
Get the flash player here: http://www.adobe.com/flashplayer
Today I visited NC State Fair 2009. There was one hall loaded with antique farm equipment. The old farm equipment is a joy to watch. This is the beginning of life long journey to farm using the older equipment. My goal is the understand the purpose of each human or animal powered equipment and build few of them as no one builds these equipments any more.
Sunday, October 11, 2009
HDTV Antenna - Day 1
It has been months since we have digital only television at home. We have been using the old black rabbit ear antenna since then. We were constantly adjusting the rabbit ear antenna to get reception. Today I finally decided to build my own HDTV antenna.
This antenna uses GH10- rev 2, Hoverman design from
http://www.jedsoft.org/fun/antennas/dtv/gh.html
The antenna is not complete yet as I ran out of time today. I tested only the main element by hanging it from the PVC frame. I cut some reflector parts. I will install them in next few weeks.
I'm using 3/4" thick PVC pipes for frame and 1/4" Outer Diameter soft copper pipe for the metal element of the antenna.
Even without the reflector, we are getting a much better reception of all local channels. Hopefully with reflector elements we will get few more channels. I will write more about the size, cost of the parts and the building process.
Monday, August 17, 2009
Mount DeWalt DW621 router to Kreg Precision Router Table insert plate

Here are the steps:
Step 1: Mark the edge of the router base plate that you want to face front with a piece of masking tape
Step 2: Place the insert plate face down on work surface with Kreg logo close to you
Step 3: Position the bull’s eye template so that the concentric rings line up with the opening of the insert plate.
Step 4: Remove the base plate from the router and using it to find the correct drill bit size for drilling holes in the insert plate
Step 5: Place the base plate face down on the bull’s eye template and center it on the concentric rings. Use the masking tape to secure the two together
Step 6: Place a sacrificial board on the drill press under the plate to reduce the possibility of blowout
Step 7: With three items secure, drill the holes using drill press
Step 8: Clamp the insert plate to drill press and drill holes into the insert plate
Step 9: After the holes are drilled separate the three items and using a counter sink bit to counter sink each hole on the top side of the insert plate to accommodate the mounting hardware
Step 10: The screw head should not sit above flush or too far below. I used 20mm long base plate screw to connect the base plate to router
I tried to ensure that the router bit stay at the center of the circular opening of the router table's insert plate. One of the mounting screws hole is on the edge
. I used a 14 mm long screw for this lower height hole.
Sunday, August 9, 2009
Resizing the length of machine screws
The 25 mm long M4X0.7 finally arrived this week.
Here are the steps to re-size the screws to 20 mm length:
Step 1: Cut router plate screws to proper length
Step 1a: Gather up the necessary tools and materials
(i) Vice
(ii) Hacksaw
(iii)Marker pen
(iv)File
(v)Foot rule
Step 1b: Measure the length of the Router plate screw needed.
Step 1c: Mark a circle on the screw where it needs to be cut.
Step 1d: Setup the screw in a vice to cut it to proper length
Step 1e: Cut the screws with hacksaw
Step 1f: Measure the length of the cut screws and file the bottom
Step 1g: Test the screws on router
Friday, August 7, 2009
Simple Pleasures
You might be wondering, “What do candles have to do with self-sufficiency?” There is more to self-sufficiency than just surviving off the land. It’s also about freeing oneself from the material world in which makes us unhappy even anxious at times. Two nights ago, my family and I sat on the couch in the living room with nothing more than burning candles to light up the room. As we watched the glowing and flickering candlelight we suddenly felt calmer and more relaxed. Even our oldest son sat still in my husband’s lap the whole time which is a surprise. Normally during the day he’s bursting with extreme energy and constantly running around. My husband and I enjoyed a hot cup of tea over long conversations. It was very pleasant. We blew out the candles at 9:05 PM and I took our son to his room and put him to bed. When I came back downstairs and began working on dishes I noticed that my breathing had changed. It was deeper and steadier than I had ever felt. I had never felt so calm like that before. The next day our son told me how he enjoyed himself and that he wants to have more candlelight time. As self-sufficient people, it is the simple things in life that we enjoy most.

Seed Saving
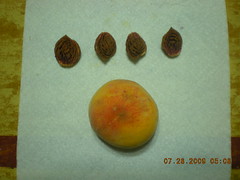
In this day and age when job losses are becoming more frequent food is a major concern for everyone. What if one can have food without worrying about having a job to pay for it? That is nothing short of possible. This peach came in a box of six and was purchased at our local farmer’s market. The peach seeds have been rinsed off and pat dry with a paper towel. They sat at room temperature to dry for 1-2 weeks and then placed inside an enveloped and sealed in a glass jar. The day we set up our farm these seeds will be sown and grown for our food. We’ll never have to worry about worry about jobs or income ever again. Our crops are the income that will feed us for the rest of our lives.
Monday, August 3, 2009
Housekeeping the Way It Was Meant To Be
There have been many commercial cleaning products that I have used to clean the house which doesn’t exactly work the way it was supposed to. To top it all off, I didn’t feel any safer to use cleaning products which had strong, toxic fumes and were not environmentally friendly. The warning labels were just plain scary to read. I had to find a solution to this problem as soon as I could for the sake of my family’s heath and well being. Finally, I found a cleaning solution that put my fears to rest. This solution consists of 1 cup of white distilled vinegar to 1 gallon bucket of hot water. An extra bucket of hot water was used to rinse out the vinegar solution as it would dry out and damage the sponge mop, according to the directions for this vinegar and water solution. With any cleaning process, of course, there has to be ventilation. I began by sweeping away all dust and other particles that were visible. As I started using this solution on my vinyl floor I was amazed at the results. It cleaned much better than any other product I have ever used in my life. I couldn’t even smell much of the vinegar as I was cleaning. Using a pitcher of warm water, I poured a little bit on the floor at a time, mopped up the water, and wrung it into the water bucket, not the vinegar bucket. Then, whatever dampness was left I wiped it up with rags and let the floor air dry. When my job was done there was not a scent of vinegar to be detected and my floor looked better than ever. I can now clean my house with peace of mind. I will continue to search for more environment friendly cleaning mixtures that will keep my family healthy and happy for years to come.
Sunday, August 2, 2009
Sunrise in the pot
Watching sun rise over the horizon is a wonderful experience. Today I will use sunrise as a metaphor.
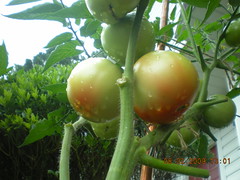
It has been little over two months since I posted my first blog entry on tomatoes growing in pots in our front yard. Today these two tomatoes have completed a full circle. I can see a reddish hue at the bottom of both the tomatoes. These are the first two tomatoes maturing this season. Two months of hard work and we have these two beauties teasing us to pick them up and cook something delicious.
The joy of watching the reddish hue first thing in the morning today was as wonderful as watching the first rays of sun in the morning.
The sun, the rain, the bees, the workers at the planting pot making factory, the makers of Miracle Grow fertilizer and the curious onlookers have contributed to this success. Thank you goes to all of them. We have a great team here. Hope to repeat this success for rest of the tomatoes this season and more in next season.
Metric measurement in a world of US measurement system
I have never thought about the type of screws in my power tools, let alone the measurement system used the measure them.
Things changed this weekend. This weekend I was planning to
I have an inch-system micrometer which measures thickness in fraction of inches. I used this micrometer to get an approximate measurement of the screw. I thought the screw is 5/32” thick at its threads. I could not find any odd fractional machine screw at my local Lowes. I picked up a few 8-32 ¾” screws. When I came home and tried the new screws on router, they did not fit.
The next step was to do some online research on this particular screw. eReplacement parts.com has a nice picture of all the router parts for DW621
Fig # 7 in the above link is the screw type I was looking for but twice its original length.
Once I get this screw, I will use a hack saw to cut it down to the required length.
I also ordered a metric drill bit to drill a hole for this 4mm screw.
Next week I will be experimenting with the metric drill bit and metric screw from amazon.com.
Couple of interesting links on metric measurement system, I came across during my research:
http://en.wikipedia.org/wiki/ISO_metric_screw_thread
http://www.france-property-and-information.com/imperial-system-and-history.htm
Tuesday, July 28, 2009
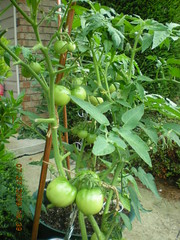
The Fruits of Our Labor
We started working on these tomato plants back in May 2009. With daily watering, powdered eggshells as plant food to provide calcium for growth and strength, some fish fertilizer, and weekly pruning we have had a successful season. Today we have an excellent crop of about 50 tomatoes total. We see more tomatoes coming out almost everyday. The best part about this is when I need tomatoes for cooking I don’t have to go to the store. I can walk right out the door, pick however many I need, wash them off and use them. We know that we are getting the best quality food because we grow it ourselves. It was a fun activity to do and even my oldest son gets involved in watering them. It makes me happy to see that we can sustain ourselves through gardening. We’ve only just begun. There’s much more to come in our efforts to be self-sufficient.
Sunday, July 26, 2009
Blockbuster Store Closing
This blockbuster store is in Raliegh, NC. I tried to take a pic of this last weekend but my camera malfunctioned. This weekend I finally got a picture.

Wood Working Hand Tools Purchasing Spree
I started woodworking at the tender age
of 10 back when I was growing up in India.
All I had back then was:
I got a little too obsessed with the Power of Power Tools when I moved to USA.
During the last couple of years I have become more appreciative of my hands and the wonderful things hands can do. I do not plan to give up any existing power tools at the same time my future focus will be on hand tools.
Maybe indirectly this is power down for me. This is an appreciation for quality over quantity. Many woodworkers may question my last statement. I have seen very high quality furniture made using power tools.
The quest for hand tools made me go through old issues of Fine Woodworking, 2008 Tools Guide from Taunton’s and Hand Tool Skills 2008 by Taunton. I learned a lot from sites like:
I started with a goal of acquiring hand tools almost a month ago. My initial hand tools research led to a sub-research on sharpening tools.
Sharpening Tools
The folks at ncwoodworker.net were very helpful in my research for hand tools. Here is a thread I started looking for advice: http://www.ncwoodworker.net/forums/f31/need-advice-sharpening-tool-24591/
Mike Davis’s post in this thread really inspired me to take a serious look at water stones for tool sharpening.
A Trip to the Sharpening Doctor, Gary Rogowski’s video and article with same title from July/August 2009 issue of Fine Woodworking magazine was also very helpful in my research.
Eventually, I decided to go for a mix of hand tools and power tools for tool sharpening needs. Hand tools for honing and sharpening and power tool for grinding. I got 15% discount on the tools I bought from the physical store. I got free shipping from Woodcraft.com on the clearance items.
Hand Sharpening Tools
• Veritas Mk. II Honing Guide
• King Brand Deluxe Waterstone, 800 Grit
• King Brand Deluxe Waterstone, 1200 Grit
• King Deluxe Gold Polishing Stone, 8000 Grit
Power Sharpening Tools
• Grizzly Wet Grinder T10010 [Not Purchased Yet]
• Tormek Pro Angle Master
• Tormek Square Edge Jig
• Tormek Long Knife Jig
I plan to use Tormek Jigs on Grizzly Wet Grinder. That’s enough about sharpening tools. Let’s get back to the Hand Tools.
Hand Planes
 I started my journey with hand planes.
There are expensive lie-neilson hand planes at one end and then there are many varieties of cheaper hand planes. Woodcraft has introduced their own brand of WoodRiver hand planes recently.
If you have some serious money and passion for hand tools there is Hotley Classic hand planes. I can’t afford neither these Hotley hand planes nor the hand planes from lie-neilson.
I hear a lot of good things about Stanley handplanes. Woodworkers usually buy them from flea markets and eBay. When I saw Stanley reintroduce sweet heart handplanes, I thought it was a great opportunity. The 15% discount this weekend from Woodcraft made the deal even sweeter. I felt like a kid in the candy store and I got them all.
• Stanley SW No 4 Smoothing Bench Plane
• Stanley SW No. 9-1/2 Block Plane
• Stanley SW No. 62 Low Angle Jack Plane
• Stanley SW No. 60-1/2 Low Angle Block Plane
Here is Stanley Plane Dating Flowchart.
Measuring and Marking Tools
I picked up a few measuring and marking tools to take advantage of the 15% discount at Woodcraft.
• PFEIL "Swiss Made" Marking Knife
• CROWN Rosewood and Brass Sliding Bevel 12"
• CROWN Awl, Round-Blade
• STARRETT Protractor Head For 12" Square
I plan on sharing my wood working experiences using these tools in future posts.

of 10 back when I was growing up in India.
All I had back then was:
- A hand saw,
- A fret saw,
- A hammer,
- Couple of cheap hand planes and
- Nails.
I got a little too obsessed with the Power of Power Tools when I moved to USA.
During the last couple of years I have become more appreciative of my hands and the wonderful things hands can do. I do not plan to give up any existing power tools at the same time my future focus will be on hand tools.
Maybe indirectly this is power down for me. This is an appreciation for quality over quantity. Many woodworkers may question my last statement. I have seen very high quality furniture made using power tools.
The quest for hand tools made me go through old issues of Fine Woodworking, 2008 Tools Guide from Taunton’s and Hand Tool Skills 2008 by Taunton. I learned a lot from sites like:
- http://www.ncwoodworker.net
- http://lumberjocks.com/
- http://www.sawmillcreek.org/
I started with a goal of acquiring hand tools almost a month ago. My initial hand tools research led to a sub-research on sharpening tools.
Sharpening Tools
The folks at ncwoodworker.net were very helpful in my research for hand tools. Here is a thread I started looking for advice: http://www.ncwoodworker.net/forums/f31/need-advice-sharpening-tool-24591/
Mike Davis’s post in this thread really inspired me to take a serious look at water stones for tool sharpening.
A Trip to the Sharpening Doctor, Gary Rogowski’s video and article with same title from July/August 2009 issue of Fine Woodworking magazine was also very helpful in my research.
Eventually, I decided to go for a mix of hand tools and power tools for tool sharpening needs. Hand tools for honing and sharpening and power tool for grinding. I got 15% discount on the tools I bought from the physical store. I got free shipping from Woodcraft.com on the clearance items.
Hand Sharpening Tools
• Veritas Mk. II Honing Guide
• King Brand Deluxe Waterstone, 800 Grit
• King Brand Deluxe Waterstone, 1200 Grit
• King Deluxe Gold Polishing Stone, 8000 Grit
Power Sharpening Tools
• Grizzly Wet Grinder T10010 [Not Purchased Yet]
• Tormek Pro Angle Master
• Tormek Square Edge Jig
• Tormek Long Knife Jig
I plan to use Tormek Jigs on Grizzly Wet Grinder. That’s enough about sharpening tools. Let’s get back to the Hand Tools.
Hand Planes
I started my journey with hand planes.There are expensive lie-neilson hand planes at one end and then there are many varieties of cheaper hand planes. Woodcraft has introduced their own brand of WoodRiver hand planes recently.
If you have some serious money and passion for hand tools there is Hotley Classic hand planes. I can’t afford neither these Hotley hand planes nor the hand planes from lie-neilson.
I hear a lot of good things about Stanley handplanes. Woodworkers usually buy them from flea markets and eBay. When I saw Stanley reintroduce sweet heart handplanes, I thought it was a great opportunity. The 15% discount this weekend from Woodcraft made the deal even sweeter. I felt like a kid in the candy store and I got them all.
• Stanley SW No 4 Smoothing Bench Plane
• Stanley SW No. 9-1/2 Block Plane
• Stanley SW No. 62 Low Angle Jack Plane
• Stanley SW No. 60-1/2 Low Angle Block Plane
Here is Stanley Plane Dating Flowchart.
Measuring and Marking Tools
I picked up a few measuring and marking tools to take advantage of the 15% discount at Woodcraft.
• PFEIL "Swiss Made" Marking Knife
• CROWN Rosewood and Brass Sliding Bevel 12"
• CROWN Awl, Round-Blade
• STARRETT Protractor Head For 12" Square
I plan on sharing my wood working experiences using these tools in future posts.
Sunday, July 19, 2009
You won't find this at retail stores.
Most shirts, or clothing for that matter, you find in retail stores have no uniqueness, creativeness, or even appropriateness. Most of the time you can never find the right size that fits you just right. That's when I decided to make clothes for myself and for my family. It gives me the flexibility to choose the style that fits my personality and fits me the way it should, unlike those cookie-cutter sizes they sell in stores that don't always fit right. In this case, It fits my oldest son the way it's supposed to. Since he has a long torso like his father the front and back pieces needed to be lengthened so that it doesn't look too short on him. The sleeves were also lengthened so that my son can grow into his shirt making it last longer by at least another year or two. This was a practice shirt since I had never made shirts before, despite my sewing experience through high school courses. Credit also goes to my husband for his help since my mother-in-law made his clothes growing up. I have to confess though, this shirt was not made from a homemade sewing pattern but it's the first step towards making patterns at home. What I did was take measurements of my son and wrote them down. Then we placed dressmakers tracing paper between the commercial pattern and large pieces of paper to transfer the pattern onto the large paper. This large paper can be found at any office supply store. As we traced the pattern onto the large paper we added more length to the pieces that needed lengthening using our son's measurements. When we finished transferring the pattern we went over the pattern with a thin marker and used a yardstick for the straight edges. We also marked any darts, dots, arrows, and such onto the new altered pattern piece and also, with a ball point pen, wrote the notes from the commercial pattern itself. We double stitched the seams for a stronger hold. Here you see the finished project. My son is so happy about his new shirt that he wants to wear this on his first day of school. If you ever notice when you make something for a family member they will take extra good care of it. Why? Because it was made from the heart not bought from some retail store. He even got to pick out his own fabric. He picked out Lightning McQueen fabric and suggested to our son that next time he should pick something that's not quite so loud. Otherwise, he loves it and we enjoyed making it for him.

Tuesday, June 30, 2009
Vertical clothes air dryer
This structure was originally designed last year to support pumpkin vines. There are no vines this year so I was thinking of putting the structure to a new use.
With temperature crossing 90 F it makes perfect sense to use this structure for clothes drying. It is a nice compact structure with
Length = 2 feet; Width = 2 feet and 6.5 feet high.
There are eight 2 feet horizontal bars for hangers. That is an equivalent of 16 feet length for hangers. It can hang 32 hangers with mixed sized clothes. That's about a load of laundry.
A 5000 Watt dryer running for an hour consumer 5 kWh of electricity. If 1 kWh of electricity costs $0.10 then 5 kWh will cost $0.50 per load. 100 loads per year is $50.00 of electricity savings per year. This is a conservative number but one can save anywhere from $40 to $60 per year just by air drying laundry. This is post tax money :)
This puppy is made out of 3/4" PVC water pipes and PVC joints. This structure can be easily disassembled any time and stowed away.
Wednesday, June 24, 2009
First Tomato of the season!
48 hours after pruning and I see the first tomato of the season. It is very exciting. Pruning definitely helped but I don't want to send the wrong message that pruning results in tomatoes.
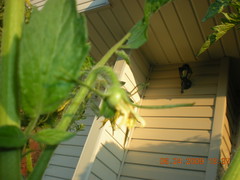
Tomato Plant in pot
I went a little crazy with pruning after reading tomato pruning tips from Fine Gardening
http://www.finegardening.com/how-to/articles/pruning-tomatoes.aspx
Pruning was done on Monday 06/22/2009
http://www.finegardening.com/how-to/articles/pruning-tomatoes.aspx
Pruning was done on Monday 06/22/2009
Sunday, May 17, 2009
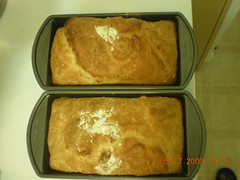
Home made bread is ready
Yes, home made bread is ready and it is ready to be sliced. It smells great! The recipe is at http://self-sufficient-future.blogspot.com/2009/05/home-made-bread.html
Home made bread
This is a simple recipe to make two loaves of home made bread.
Ingredients:
(1) 8 cups of flour
(2) 2 teaspoon yeast
(3) 2 teaspoon baking powder
(4) 2 teaspoon salt
(5) Cooking Spray
Bread Pan Size: 9.25" X 5.25"
Steps:
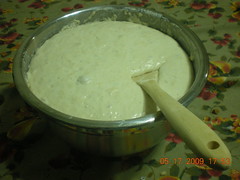
1) Add the ingredients and 8 cups of water.
2) My son helps me mix the ingredients with a wooden spoon
3) Let the mixture sit for an hour. The picture is taken after and hour of mixing the ingredients. The mixture rises.
4) Grease the inside of the bread pans with either butter or cooking spray and pour the mixture in bread pans
5) Bake at 450F in oven for 45 minutes
Home made bread is ready to be sliced!
Ingredients:
(1) 8 cups of flour
(2) 2 teaspoon yeast
(3) 2 teaspoon baking powder
(4) 2 teaspoon salt
(5) Cooking Spray
Bread Pan Size: 9.25" X 5.25"
Steps:
1) Add the ingredients and 8 cups of water.
2) My son helps me mix the ingredients with a wooden spoon
3) Let the mixture sit for an hour. The picture is taken after and hour of mixing the ingredients. The mixture rises.
4) Grease the inside of the bread pans with either butter or cooking spray and pour the mixture in bread pans
5) Bake at 450F in oven for 45 minutes
Home made bread is ready to be sliced!
Closed Wolf Camera store
I went to my nearest mall today. The wolf camera store has no items on the shelves. This is one of the Wolf camera stores which was closed last month as the parent company Ritz Camera Centers Inc went bankrupt.

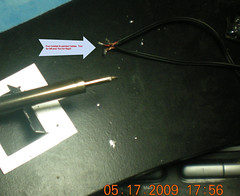
Headphone cable repair
Last year my son used a pair of scissors to cut cable of my Bose over the ear headphones. These are good quality and expensive headphones . They were $100 when I bought them.
Today evening. I started my repair session with a set of soldering iron and solder. Very soon I realized there are four cables. Two for left and tow for right ear. One pair is green and bronze, the other pair is red and bronze. A simple multi-meter connectivity test failed for these cables.
Each cable is a very thin twisted wire with a non-metallic thread at the core. The failure of connectivity test meant that there is some kind of lacquer/paint covering the thing twisted wires. I used my flat tip soldering iron with a little bit of solder to melt the paint and also create a soldering connection with the wires.
I repeated this step for all eight cables coming from two broken ends. This time multi-meter connectivity test passed. The multi-meter connectivity test was performed on the connector end of the broken set. This proves that the hot solder was able to melt the paint and also create an electrical connection with the wires.
I took the same colored cables from both broken ends and soldered them. I tested the ear-phone with my iPod. It was working!. Finally I used black electrical tape to seal the soldered ends.
Wednesday, May 13, 2009
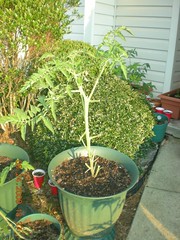
Tomato and Cilantro
I spent last couple of weekends to move some of the tomato and cilantro sprouts to slightly bigger containers.
This year there is no money to buy clay pots so I'm using plastic cup as container.
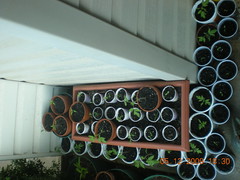
This year there is no money to buy clay pots so I'm using plastic cup as container.
Potato
I planted potato last year in the same container. The plant died last year from bug attack. I think some of the roots from last year survived and when the temperature was right this year, it started growing.
Lesson learned: Potato can survive under ground during winter and grow during summer
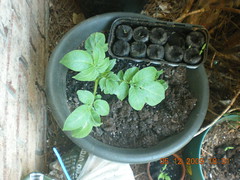
Lesson learned: Potato can survive under ground during winter and grow during summer
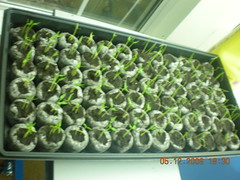
Green Shoots
Very successful sprouting of onion and chili pepper seeds. Over 90% success rate. Never had this kind of success rate in past.
The seeds were planted by my wife so credit goes to my wife.
Left half is chili pepper and right half is onion.
I may not have enough space to grow these plants to full maturity. I have to check with my friends if they are interested in taking some of these sprouts.
By the way, these are real green shoots and not the fake green shoots that financial media is talking about these days.
Monday, May 4, 2009
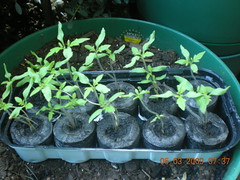
Tomato Sprouts
I bought these tomato seeds with pellets at the end of the gardening season last year at 50% discount. This is the third weeks since they were planted in the pellets. I'm satisfied with their growth so far. This is the first time I have used seeds from previous year. This is a good money saving idea.
We are also collecting all the egg shells from the eggs we eat. I grounded the egg shells we have collected so far. Finely powdered egg shells is going to be a good source of calcium for tomato plants this year. Slightly bigger chunks of egg shells will be used as slug deterrent .
We are also collecting all the egg shells from the eggs we eat. I grounded the egg shells we have collected so far. Finely powdered egg shells is going to be a good source of calcium for tomato plants this year. Slightly bigger chunks of egg shells will be used as slug deterrent .
Subscribe to:
Posts (Atom)
